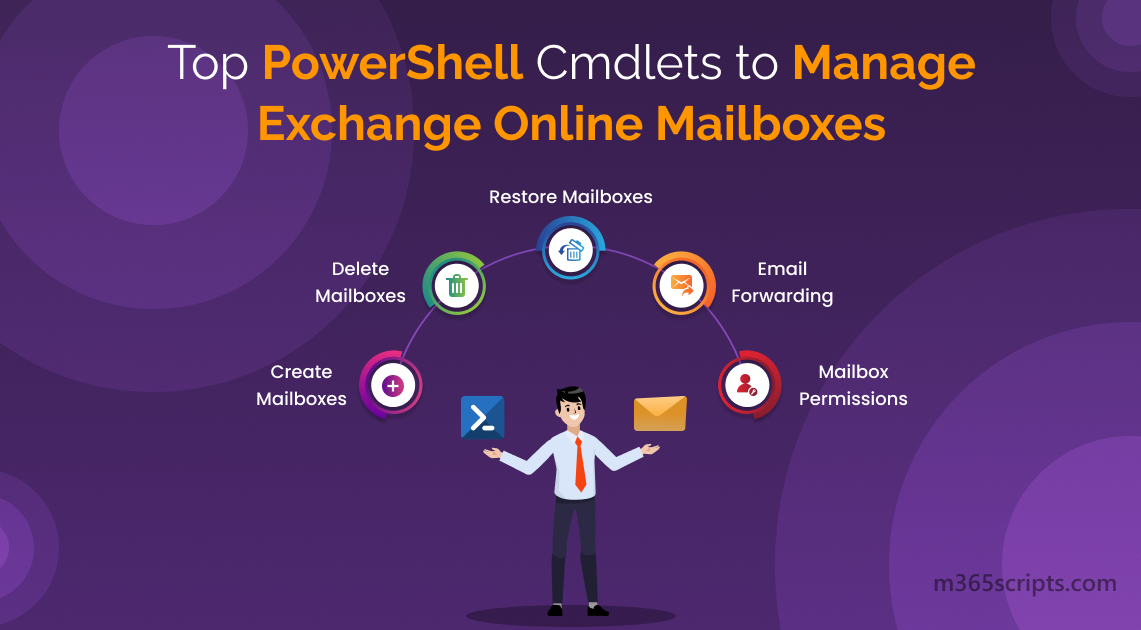
Top PowerShell Cmdlets to Manage Exchange Online Mailboxes
Exchange Online mailboxes are a boon to Microsoft 365 making your organization’s productivity and collaboration to new heights. To ensure smooth email communication between users, admins need to manage the Exchange Online mailboxes effectively.
However, manually managing mailboxes is time-consuming as you need to jump here and over to manage mailboxes in the organization. To shed light on your endless hours on manual mailbox management, a growing tiresome “Exchange Online PowerShell” lends its hands! Yeah, you can manage mailboxes using PowerShell by simple cmdlets.
Let’s get into this blog to explore how PowerShell plays its role in mailbox management.
You can manage mailboxes in the Exchange admin center, but it lacks to manage a few settings like active sync settings, single item recovery settings of mailboxes, etc. To bind the gap, PowerShell comes in!
By using the Exchange Online PowerShell module, you can manage mailboxes effectively by performing operations such as
- Create new mailbox in Microsoft 365 using PowerShell
- Delete an Exchange Online mailbox using PowerShell
- Restore a mailbox in Exchange Online
- Manage single Item recovery for a mailbox in Exchange Online
- Manage mailbox delegation using Exchange Online PowerShell
- Get mailbox details using the Exchange Online module
- Get the storage size of an Exchange Online mailbox
- Enable/Disable automatic replies for Exchange Online mailboxes
- Convert a mailbox using Exchange Online PowerShell
- Configure email forwarding for a mailbox in Exchange Online
- Manage Exchange Online mailbox with message delivery restrictions
- Get the recipient limit of a user mailbox
- Hide a mailbox from the Global Address List in Microsoft 365
- Manage Exchange ActiveSync for a mailbox
- Exchange Online PowerShell to enable or disable MAPI
- Check mailbox plans in Exchange Online
- Manage email addresses for an Exchange mailbox
- Bulk operations in managing Exchange mailboxes using PowerShell
By the way, make sure to connect to the Exchange Online PowerShell module, before getting into the above ways for efficient mailbox management.
Creating a mailbox is indeed a crucial step in facilitating effective collaboration within a team. Also, mailbox creation is a way for the users to interact with team members effectively by sharing calendars, scheduling meetings, exchanging files, etc. However, creating mailboxes is not possible in the Exchange admin center.
Thus, to create a mailbox, you can execute the below PowerShell cmdlet.
New-Mailbox -Alias <Alias name of the user> -Name <Name of the user> -FirstName <First name of the user> -LastName <Last name of the user> -DisplayName <Display name of the user> -MicrosoftOnlineServicesID <Email Id of the user>
Note: After assigning a new mailbox, you should assign the license to the respective user, else it will be disabled in 30 days.

To verify it, navigate to Exchange admin center>Recipients>Mailboxes.
In some cases, users may occasionally quit the office or have their employment terminated. After not being part of the company, there will be no use of their mailboxes. So, you can delete those user mailboxes from Exchange Online.
Remove-Mailbox -Identity <mailbox name>
You will be prompted for a confirmation of your deletion. After that, the mailbox gets removed from the Exchange admin center.
If you wish to preserve some essential messages from a user’s Outlook mailbox, you can export the emails as EML files for future use.
Did you mistakenly delete a user mailbox? Don’t worry! You can restore the deleted mailbox using PowerShell.
To restore a mailbox, make use of the undo-SoftDeleteMailbox cmdlet.
Undo-SoftDeletedMailbox <Deleted user mailbox name>

Note: The default retention period for the deleted items is 14 days, which can be modified to a maximum of 30 days. However, the item gets deleted and can’t be recovered after 30 days, unless you have enabled single item recovery for your mailboxes.
Do you want to keep the items in recoverable folder for a few more days? You can make it happen with a single item recovery. Enabling single Item recovery allows you to recover the hard deleted items even after the expiration of their retention periods.
To enable a single item recovery for a mailbox, run the below PowerShell cmdlet.
Set-Mailbox -Identity <Mailbox name> -SingleItemRecoveryEnabled $true -RetainDeletedItemsFor <days>
Note: You can configure the retention period to a maximum of 30 days.
To enable single item recovery setting for all user mailboxes including retention period, follow up the below cmdlet.
Get-Mailbox -ResultSize unlimited -Filter "RecipientTypeDetails -eq 'UserMailbox'" | Set-Mailbox -SingleItemRecoveryEnabled $true -RetainDeletedItemsFor <days>
To verify it, you can run the below cmdlet, which shows the status of the single item recovery property of the mailboxes.
Get-Mailbox -ResultSize Unlimited | Select-Object DisplayName, PrimarySmtpAddress, SingleItemRecoveryEnabled

Above all, managing mailbox delegations stands first. Assigning the right level of delegation to the right users eliminates unauthorized access, suspicious activities thereby preventing data leakages. You can grant delegate mailbox permissions using Exchange Online PowerShell. This cmdlet works by adding respective permission to the users for secure access control to Exchange mailboxes.
To assign “Send on Behalf” permission to a user mailbox, make use of the below cmdlet.
Set-Mailbox -Identity <mailbox name> -GrantSendOnBehalfTo < user email>
To provide “Send As” delegation to a user, run the below cmdlet.
Add-RecipientPermission -Identity <mailbox name> -Trustee < user email> -AccessRights SendAs
You can provide “Full Access” over your mailbox by executing the below cmdlet.
Add-MailboxPermission -Identity <mailbox name> -User < user email> -AccessRights FullAccess
Added to the above, you can use ‘Get-EXOMailboxPermission‘ cmdlet to review the permission of the user has on mailboxes.
Note: To review mailbox permissions ,refer the blog to export mailbox permission report .
Getting mailbox details in Microsoft 365 will help you to manage the user’s mailbox effectively. From this information, you can be able to take decisions like changing display name/alias, tracking storage limits, etc.
To get mailbox details, run the following cmdlet.
Get-Mailbox -ResultSize Unlimited

Also, you can use ‘Get-EXOMailbox’ to retrieve bulk mailboxes along with their properties.
Monitoring the storage size of a user mailbox is crucial to eliminate storage capacity, otherwise Exchange Online mailboxes will be throttled. To get the storage occupied in a user mailbox, run the following cmdlet.
Get-MailboxStatistics -Identity <Mailbox name> | Select-Object DisplayName, TotalItemSize

Added to the above , you can also get detailed mailbox size report using PowerShell.
Note: You can use ‘Get-EXOMailboxStatistics‘ for additional details such as, messages count in mailbox, last access time to manage Exchange Online mailboxes more effectively.
Managing automatic replies is the efficient way to manage your email communication during your absence or unavailability in the organization.
To enable an automatic reply, follow up the cmdlet below.
Set-MailboxAutoReplyConfiguration -Identity <MailboxName> -AutoReplyState Enabled
Furthermore, you can configure auto reply messages for internal and external recipients and can schedule automatic replies using the below PowerShell cmdlet.
Set-MailboxAutoReplyConfiguration –Identity <mailbox name> -AutoReplyState Scheduled –StartTime <start time> -EndTime <end time> -ExternalMessage <external message> -InternalMessage <internal message>
To disable automatic replies of a user mailbox, execute the cmdlet in PowerShell.
Set-MailboxAutoReplyConfiguration -Identity <Mailbox name> -AutoReplyState Disabled
Also, PowerShell enables you to gain mailbox automatic reply configuration reports for better management of mailboxes.
Converting mailboxes ensures that only the designated user has access to the mailbox, enhancing data security and compliance. You can convert the mailbox to any type based on your requirement such as user mailbox to Shared mailbox, Shared mailbox to room mailbox, etc.
Set-Mailbox -Identity <mailbox name> -Type <Regular | Room | Equipment | Shared>
To verify whether it gets converted to your desired type, run the below cmdlet.
Get-Mailbox -Identity <respective mailbox> | Format-List RecipientTypeDetails

Instead of spending hours in manual forwarding of emails, make use of the Powershell to enable email forwarding in Exchange mailboxes. It will automatically forward the emails to the respective users amidst your busy schedules.
Set-Mailbox -Identity <mailbox name> -ForwardingSmtpAddress < forwarding address of the user> -DeliverToMailboxAndForward $true
Note: You can download the script given in the blog to export email forwarding report using PowerShell. Email forwarding can also be configured by creating an inbox rule using PowerShell in Exchange Online.
Managing message delivery restrictions can help you make sure that sensitive information is shared only among authorized users. This will help you to prevent sensitive information from falling into the wrong hands.
To configure the mailbox to accept mails from specific users, run the cmdlet below.
Set-Mailbox -Identity <mailbox name> -AcceptMessagesOnlyFrom @{add=<authorized users>}
To configure the mailbox to block emails from specific users, run the below cmdlet.
Set-Mailbox -Identity <mailbox name> -RejectMessagesFromDLMembers @{add= <authorized users>}
The ‘add‘ parameter in the above cmdlets will let you configure your mailboxes to accept or reject messages sent by particular users.
Sending mails to bulk recipients can cause email traffic and network crashes within the organization. To avoid such things, monitoring of recipient limit for the users’ mailboxes is essential for efficient email communication.
You can execute the below cmdlet to configure recipient limit of a user mailbox.
Set-Mailbox –Identity <Mailbox address> -RecipientLimits <Limit>
To verify it, run the below cmdlet.
Get-Mailbox -Identity <Mailbox address> | Select-Object RecipientLimits

By hiding a mailbox from the Global Address List, you can prevent unauthorized users from easily finding and accessing confidential mailboxes, thereby keeping confidentiality.
You can hide a mailbox from GAL, by running the below cmdlet.
Set-Mailbox -Identity <mailbox name> -HiddenFromAddressListsEnabled $true
ActiveSync allows you to sync your mailbox with mobile devices. To disable ActiveSync, execute the following cmdlet.
Set-CASMailbox -Identity <mailbox name> -ActiveSyncEnabled $false
To enable ActiveSync, execute the following cmdlet
Set-CASMailbox -Identity <mailbox name> -ActiveSyncEnabled $true
MAPI (Messaging Application Programming Interface) is a protocol that enables users to access their mailboxes using email clients like Outlook, etc. It is crucial to manage MAPI, as there may be a chance of potential security breaches that can occur if a user’s device is compromised by the attackers. However, MAPI is enabled for all the mailboxes by default.
To disable MAPI for the mailbox, make use of the PowerShell cmdlet below.
Set-CASMailbox -Identity <Mailbox name> -MAPIEnabled $false
At the time of license assigning, the new mailbox settings automatically get configured by the corresponding mailbox plans. Sometimes, you may have multiple mailboxes plans for the assigned license.
To know the mailbox plans available for your mailboxes, go with the below cmdlet. Get-MailboxPlan cmdlet information like role assignment policy, maximum send size of an email, retention period can be obtained.
Get-MailboxPlan -ResultSize Unlimited | Format-List DisplayName,IsDefault,Max*Size,IssueWarningQuota,Prohibit*Quota,RetainDeletedItemsFor,RetentionPolicy,RoleAssignmentPolicy
In some cases, you might have added incorrect mail addresses to your mailboxes. However, PowerShell allows you to modify the added email addresses.
Set-Mailbox -Identity <Mailbox name> -EmailAddresses @{Remove=<existing email address>; Add=<new email address>}
Adding unwanted email address will cause flooding of emails to your mailbox. However, you can remove the unwanted email addresses by running the below PowerShell cmdlet.
Set-Mailbox <mailbox name> -EmailAddresses @{remove=< email id>}
To gain detailed reports on Microsoft 365 mailboxes’ primary SMTP addresses, check out the blog to get all Office 365 email addresses.
The above operations are quite easy when you ought to manage Exchange Online mailboxes. But if you need to manage more than 2 mailboxes, you will faint by executing cmdlets each time. So, PowerShell produces simple cmdlets to perform bulk operations on Exchange mailboxes. Let’s see some of the bulk operation for efficient Exchange mailboxes management.
- Create bulk mailboxes in Exchange Online
- Remove bulk mailboxes using PowerShell
- Bulk conversion of Exchange Online mailboxes
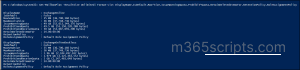
1. Create Bulk Mailboxes in Exchange Online
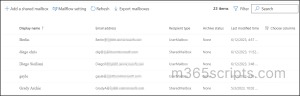
To create multiple mailboxes at a time, you need to create a CSV file having mailbox name and respective mail address like the below screenshot.
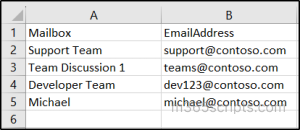
After creating a CSV file in the above format, save your file and note down the location of your CSV file. Once done, execute the PowerShell script below.
Import-Csv <file location> | foreach {New-Mailbox -Name $_.Name -MicrosoftOnlineServicesID $_.EmailAddress}

2. Remove Bulk Mailboxes Using PowerShell
You can make a CSV file with the mailbox identities you want to remove, to make bulk deletion process easy.
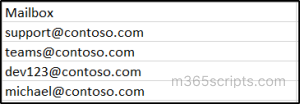
Once done with the CSV file, let’s move to the PowerShell script to delete a mailbox.
 Import-Csv -Path <File location> | ForEach-Object {

    Remove-Mailbox -Identity $_.Mailbox -Confirm:$false

}
3. Bulk Conversion of Exchange Online Mailboxes
Converting mailboxes one by one eats up your time. To save your time in bulk conversion of Exchange Online Mailboxes, create a CSV file with columns named “Mailbox” and “Type”.

Now, execute the PowerShell cmdlet to convert multiple mailboxes at a time.
Import-Csv -Path <file location> | ForEach-Object {

    Set-Mailbox -Identity $_.Mailbox -Type $_.Type

}
Don’t end up yourself ! Know some more PowerShell cmdlets to manage mailboxes efficiently.
After executing bulk mailbox operations with PowerShell, keeping a close eye on their implementation in Microsoft 365 is crucial. However, you need to switch between multiple tabs to check whether your bulk mailbox actions are executed. Such a big hassle, right? To help you with this, AdminDroid lends its hand. AdminDroid isn’t just a tool to check your bulk mailbox operations; it’s a one-stop solution, providing you with complete 360-degree monitoring of entire Exchange Online.
AdminDroid goes above and beyond native tools by offering deeper visibility over mailbox permissions, memberships, and configuration. From mailbox flow to advanced threat protection and protocols, AdminDroid brings you unparalleled insights and control.
Here are some of the mailbox reports from AdminDroid’s Exchange Online reporting tool:
- Recently created/deleted mailboxes
- Exchange Online mailbox usage
- Mailbox permissions
- Daily storage usage of mailboxes
- Shared/Inactive mailboxes
- Mailboxes with external sharing configurations
But that’s not all! AdminDroid’s Exchange Online auditing tool takes your mailbox monitoring to the next level with reports such as:
- Guest access to mailboxes
- Users’ mailbox logins
- Mailbox configurations
- Mailbox permission changes
- DLP rule matched mail messages
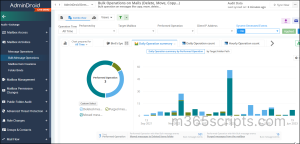
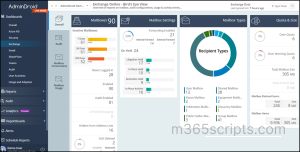
In the journey of unveiling AdminDroid’s exceptional features, the spotlight now shifts to AdminDroid’s Exchange Online dashboard! This dashboard offers a comprehensive view of your Exchange Online environment, showcasing audit configurations, mailbox permissions, mail flow, and mailbox usage activities in a visually stunning manner.
So, believe it, AdminDroid is your go-to tool giving 170+ reports for efficient and effective Exchange Online management!
The best part? With AdminDroid, you gain access to over 1800+ reports and 30+ dashboards that offer valuable insights into usage, security, and compliance across various Microsoft 365 resources, including Azure AD, Exchange Online, OneDrive, SharePoint Online, and beyond.
Why are you still staring out? Download AdminDroid now and get fingertip insights into your Exchange Online mailboxes!
We hope this blog brings you more information on Exchange mailboxes management. Further, feel free to reach us in the comment section for your doubts and clarifications.