
How to Create Bulk Users in Microsoft 365
As organizations grow and take on new projects, admins often have to add new users in Microsoft 365 to keep things running smoothly. When it comes to adding multiple users all at once, doing it manually for a few users might be okay, but for a bunch of them? That’s where things get tough. 😑 That’s a hassle requiring significant time and manual effort.
Don’t worry! Microsoft simplifies this bulk user creation process with a better option. What’s that? 👇
Microsoft never lets you down! The easiest way to add several users at once in Microsoft 365 is through a CSV file. You just need to fill in the required user properties and upload it! The specified users in the CSV get automatically created in Microsoft 365. This handy option can be availed through different approaches given below. Let’s see them in detail.
- Create bulk users using the Microsoft 365 admin center.
- Add multiple users using the Microsoft Entra admin center.
- Create new users in bulk using Microsoft Graph PowerShell.
- Bulk-create users in Microsoft 365 using Microsoft365DSC.
The easiest way to create bulk users is via the Microsoft 365 admin center. Let’s see how to do it.
1. Sign in to the Microsoft 365 admin center.
2. Navigate to the Users blade and select “Active users.”
3. On the Active users page, click the “Add multiple users” option that appears at the top.
4. Select the checkbox “I’d like to upload a CSV with user information” (Note: You can also use the “Add list of users” option, but it’s like manual addition, which is less preferable.)

5. You’ll then have two options:
- Download a blank CSV file with required headers: Upon selecting this option, a CSV file will be downloaded containing specific headers for user properties. Instead of starting from scratch, you can utilize this file as a template. Simply you need to add the user details in the necessary columns and save it.
- Download a CSV file that includes example user info: If you’re uncertain about adding respective properties in the columns, this option provides a reference. It contains sample user details that you can glance at to ensure correctness. You can then create a new one or edit the downloaded CSV file with the correct data based on this reference.
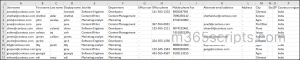
These options are optional; you can create your own CSV file as you wish.
6. Next, you’ll need to browse and upload the newly created or edited CSV file in the “Upload CSV file with your user information” option. If any formatting errors or missing mandatory parameters are detected in the uploaded file, you’ll receive a notification as shown below.

After clicking “view errors,” you’ll see the respective errors in your CSV file. You need to correct them and reupload the modified CSV file.
7. Once done, click “Next“. You’ll be directed to the License page.
8. Then, configure usage location and assign licenses to the users based on your requirements. You can even skip assigning licenses using the “Don’t assign any licenses” option. After making your selections, click “Next.”
9. Finally, review the configurations and proceed to add users to Microsoft 365.
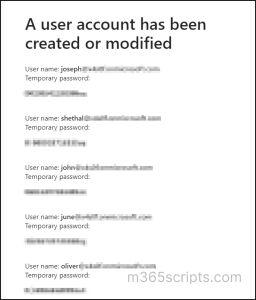
After completing the process, a result page will open, displaying the number of users created. During this process, a temporary password is automatically generated and displayed on the result page. You can share it with yourself and then email the respective users with the temporary passwords. Later, you can manage passwords using PowerShell to enable actions such as password changes, forcing users to reset passwords, configuring password expiration, and more.
Points to Note:
- Make sure the column headings in the CSV file match exactly with those in the sample spreadsheet. You shouldn’t add, delete, or edit the column headings.
- You are limited to 249 users per CSV file. So, you need to create multiple spreadsheets to add 250 or more users to Microsoft 365.
- The username, first name/last name, and display name are required, and you cannot add a new user without this information. Other information can be left blank.
- For users with different usage locations, create separate spreadsheets grouping similar usage location users.
- Be mindful of character limits for crucial properties such as username, first name, last name, etc.
- Save the file as a CSV (comma delimited) with the exact 16 columns.
- Avoid using accent marks (á or ñ) or periods(.) at the beginning or end of email addresses.
- User principal names and email addresses should be unique for all users. (This condition is applicable for all the methods).
To create bulk users in Microsoft 365, you can also utilize the Microsoft Entra admin center. Here are the steps to bulk-create users in the Entra admin center using a CSV file:
1. Sign in to the Microsoft Entra admin center.
2. Expand Identity and select “All users” from the Users blade.
3. Select the “Bulk Create” option from the Bulk operations dropdown that appears at the top.
4. Now, you can either use the provided sample file as described in the above method, or you can upload your own CSV file using the “Upload your CSV file” option.
5. Click “Submit.” The CSV file will undergo validation. If successful, you’ll see a “File uploaded successfully ” notification/message. If there are errors, you must fix them and resubmit.
That’s it! New users will be created in Microsoft 365. You can view the results of the process from the Bulk operations results page.

Point to Note:
- Ensure you configure the required values (Name, User principal name, Initial password, and Block sign-in (Yes/No)) for each user. You would get an error if you missed configuring any of these values. However, other columns/properties can be left as per your choice.
Using Microsoft Graph PowerShell, you can eliminate the hard limit of 249 users per CSV file. Therefore, you can effortlessly utilize Microsoft Graph PowerShell to efficiently create 250+ user accounts without any hassle. Before proceeding with bulk user creation in Microsoft 365, ensure you connect to Microsoft Graph PowerShell.
Once done, you can follow the below steps to add multiple users to Office 365 using Graph PowerShell.
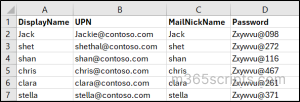
1. Create a CSV file with the following headers: DisplayName, UPN, MailNickName, and Password. Once done, save it and mark down the location of the created CSV file.
 2. Once your CSV file is ready, utilize the PowerShell script given below that loops through the ‘New-MgUser’ cmdlet to create bulk new users.
Import-Csv <FileLocation> | Foreach {
    $Password = @{Password = $_.Password}
    New-MgUser -DisplayName $_.DisplayName -AccountEnabled -UserPrincipalName $_.UPN -PasswordProfile $Password -MailNickname $_.MailNickName
}
Points to Note:
- To create bulk users in Microsoft 365 using PowerShell, certain properties like DisplayName, UPN, MailNickName, Password, and AccountEnabled are mandatory. Other properties can be left unconfigured.
- Passwords must adhere to specific criteria: Your passwords should be 8 to 16 characters long and include a mix of small letters, capital letters, numbers, and symbols to make them safer.
Microsoft365DSC is a powerful tool that takes bulk user creation in Microsoft 365 to the next level! Microsoft365DSC uses the PowerShell Desired State Configuration (DSC) framework. This means you can quickly add multiple Office 365 user accounts at once by using its “Configuration-as-code” approach.
With just three simple cmdlets and a DSC code, you can automate the entire process of adding users to Microsoft 365 seamlessly.
Before diving in, ensure you have Microsoft365DSC installed and familiarize yourself with its capability of automating Microsoft 365 configurations. It helps to understand how to run the code below.
Now, let’s break down the process of creating Office 365 user accounts in bulk using M365DSC:
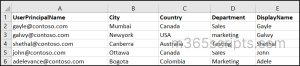
1. All you need is to prepare a CSV file containing user details such as DisplayName, User Principal Name (UPN), Department, and any other necessary attributes based on your needs. This CSV file acts as the data source for user creation.
2. Then, run the code in Windows PowerShell console to create multiple M365 user accounts. The Microsoft365DSC code provided below can then interpret this data and automate user creation accordingly.
param (
    [parameter()]
    [System.Management.Automation.PSCredential]
    $Credential
)
Configuration M365TenantConfig
{
    param (
        [parameter()]
        [System.Management.Automation.PSCredential]
        $Credential
    )
    if ($null -eq $Credential)
    {
        <# Credentials #>
        $Credscredential = Get-Credential -Message "Credentials"
    }
    else
    {
        $CredsCredential = $Credential
    }
    $OrganizationName = $CredsCredential.UserName.Split('@')[1]
    Import-DscResource -ModuleName 'Microsoft365DSC' -ModuleVersion '1.24.117.1'
    Node localhost
   {
    Import-Csv -Path "<CSV_FilePath>" | ForEach-Object {
        $UserPrincipalName = $_.UserPrincipalName
        AADUser $UserPrincipalName
        {
            UserPrincipalName    = $UserPrincipalName  # Assigning the UserPrincipalName property
            City                 = $_.City
            Country              = $_.Country
            Department           = $_.Department
            DisplayName          = $_.DisplayName
            Credential           = $CredsCredential
        }
    }
  }
}
M365TenantConfig -ConfigurationData .\ConfigurationData.psd1 -Credential $Credential
You’ve got the above options for creating bulk users in Microsoft 365, but each method serves different needs. Let’s break down the usage of each method so you can choose the one that fits your requirements:
- If your organization is small and you only need to create a few users (less than 250), stick to the Entra admin center or Microsoft 365 admin center method. But if you need to create a larger number of users, like hundreds or more, it’s better to use Microsoft365DSC or PowerShell.
- The first two methods limit you to configure specific properties of the user. If you want to configure all user properties, including setting user hire dates/fire dates, company name, age group, password, and employee id, you can opt for PowerShell.
- To assign licenses, group memberships, and specific properties at the time of user creation itself, you can opt for Microsoft365DSC.
I hope this blog effectively covers all the methods for creating bulk users in Office 365 and provides insights into their usage based on your specific needs. Furthermore, feel free to reach out to us in the comment section for any queries.