How to Schedule PowerShell Scripts Using Azure Automation
When it comes to PowerShell scripts, scheduling is a critical task for maintaining consistency, especially for tasks that need to be executed at regular intervals. This is where automating scripts in Azure Automation becomes helpful, offering significant benefits for Microsoft 365 admins by streamlining repetitive tasks. Now let’s get started with how to schedule PowerShell scripts using Azure Automation.
Azure Automation is a service by Microsoft that empowers you to automate repetitive cloud management tasks. This service offers a platform with role-based control, allowing you to automatically create, deploy, monitor, and maintain the Azure resources through Runbooks. But what exactly are Runbooks?
Runbook is a graphical authoring tool that lets users create scripts in the Azure environment.
Here’s a breakdown of the essential prerequisites to schedule PowerShell scripts using Azure Automation, focusing on subscriptions and licensing.
- Azure subscription
- Microsoft Entra ID P1 or P2 license
Here’s a step-by-step process of scheduling PowerShell scripts with Azure Automation for cloud-based workflow automation.
- Create an Azure Automation account
- Add modules to the Azure Automation account
- Create a new PowerShell Runbook
- Schedule Runbooks in Azure Automation
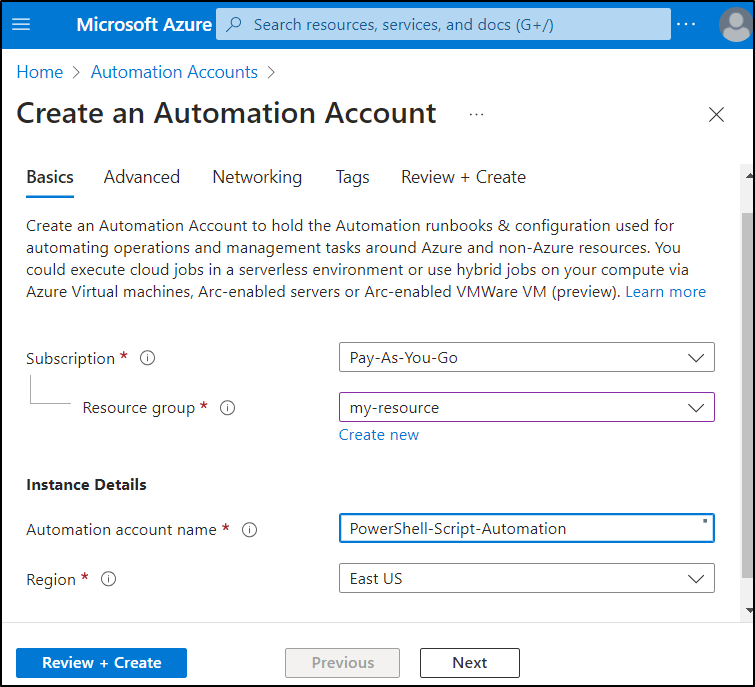
The first step in scheduling PowerShell scripts is to set up an automation account in Azure. Navigate to the Azure Portal and follow the steps described here to create a new automation account.
- Sign in to the Azure Portal and search for automation accounts.
- To create a new automation account, click on the Create button.
- Select your Azure Subscription from the respective drop-down and select the Resource group. If you don’t have a resource group, create a fresh one.
- Enter the name for the new automation account and select the Region.
- Click on the Review + Create button.
- Once again, review the details and choose the Create button.
Modules contain predefined reusable PowerShell code that extends the functionality of scripts. In Azure Automation accounts we can add or import the necessary modules for the scripts scheduled to run. Follow these steps to add a PowerShell module for script execution.
- Navigate to the created automation account page. Then, go to the Modules tab under the Shared Resources section.
- Choose the Add a module option.
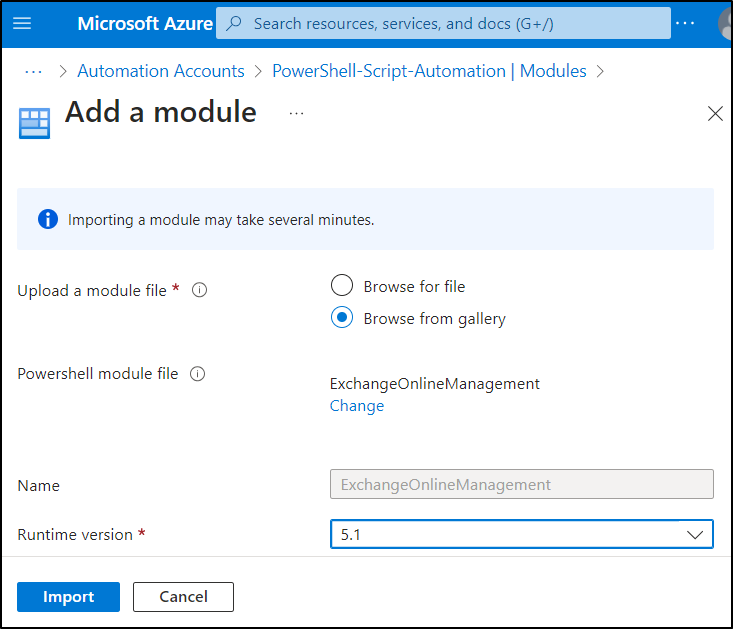
- If you want to manually import modules from your local machine, choose the Browse for file radio button, then provide the PowerShell module file, Name, and Runtime version. Then, click the Import button.
- Alternatively, to import inbuilt modules from the gallery, choose the Browse from gallery option.
- Search for the name of the module you want to add. Then, pick the respective module.
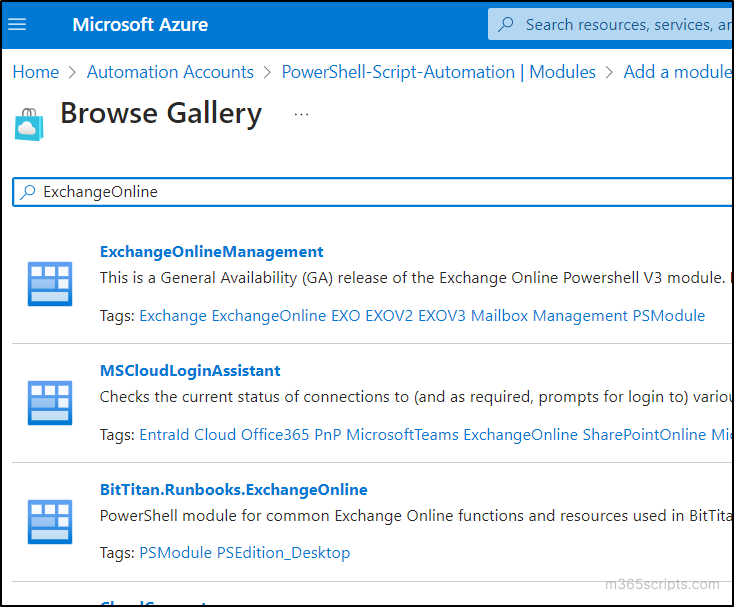
- Verify the chosen module and hit the Select button.
- Choose the Runtime version and click on the Import option.
You can use the Modules tab to manage modules in Azure Automation for adding, updating, and deleting the modules.
In Azure, a Runbook is an automated script that helps you manage and configure your cloud-based resources and services. The Runbook tab lists all the published Runbooks with appropriate information. Here are two methods and their step-by-step procedure on how to create a PowerShell Runbook in Azure Automation.
Create a Runbook in Azure Automation
In this approach, you can write the Runbook script within the Azure portal editor. This method is suitable for building unique Runbooks tailored to specific needs.
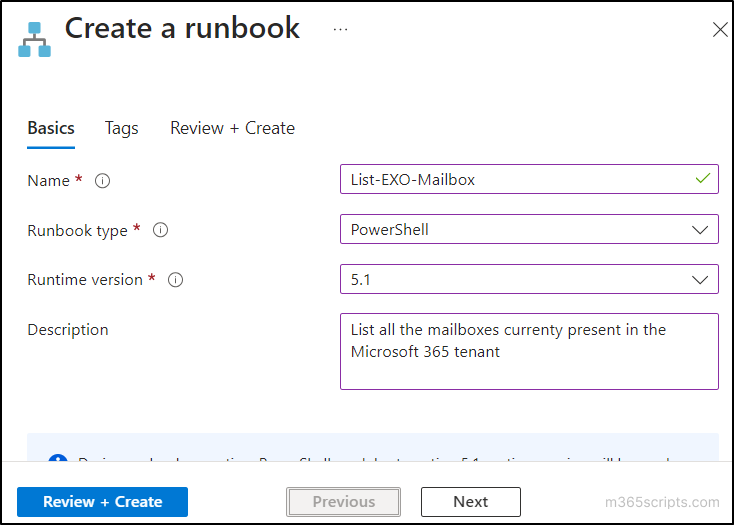
- Head to the Runbooks tab under the Process Automation section and select the Create a Runbook option.
- Enter the name of the Runbook and choose PowerShell as the Runbook type.
- Select the Runtime version from the drop-down and provide the description in the appropriate text box.
- Click on the Review + Create button. After that, check the details and choose the Create button.
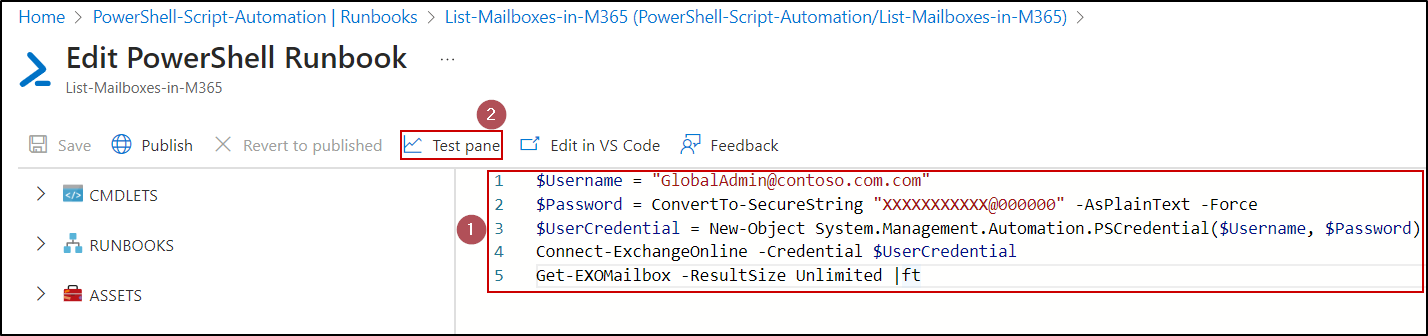
- It will bring you to the editor, where you can type the script. You can use the Test pane in the editor to test the script you have written to ensure correct execution.
- After preparing the script, you click on the Publish button.
- It will ask for confirmation to publish the Runbook. Select Yes.
Note: You can store and manage credentials in the Azure Automation account for reusability across multiple automation workflows and scripts.
Import a Runbook to Azure Automation
This approach enables you to upload a pre-written script (.ps1 for PowerShell) file as a Runbook in Azure Automation.
- In the Runbooks tab, select the Import a Runbook option
- Choose the Browse for file radio button in the Upload a Runbook file option.
- Browse and select the PowerShell script in the Runbook file option.
- After that, select the Runbook type and Runtime version. Also, provide the Description of the PowerShell script (optional).
- Select Import.
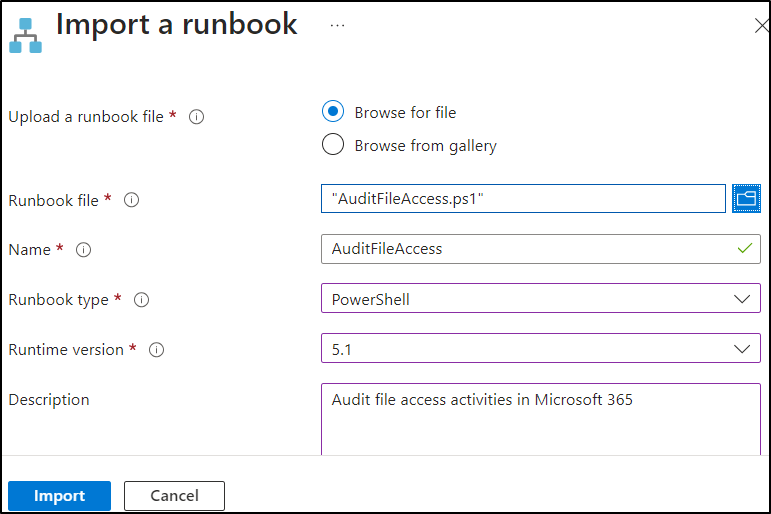
- After that, choose the Publish button in the Azure portal editor. Select Yes.
Note: Before scheduling the PowerShell script, you can trigger Azure Automation Runbook using the Start button in to check whether it works as intended. This option is also useful when you need to manually run a PowerShell script before or after the scheduled time for any instant execution.
To schedule PowerShell scripts Using Azure Automation to automatically run at specific intervals, follow the steps:
- Go to the respective Runbook and choose the Link to schedule option.
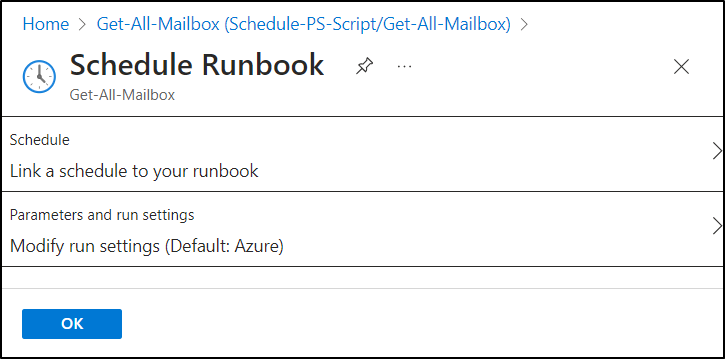
- Select the Link a schedule to your Runbook option and choose the appropriate schedule. If you don’t previously have a schedule in your Azure Automation account or want to create a new one, follow these steps.
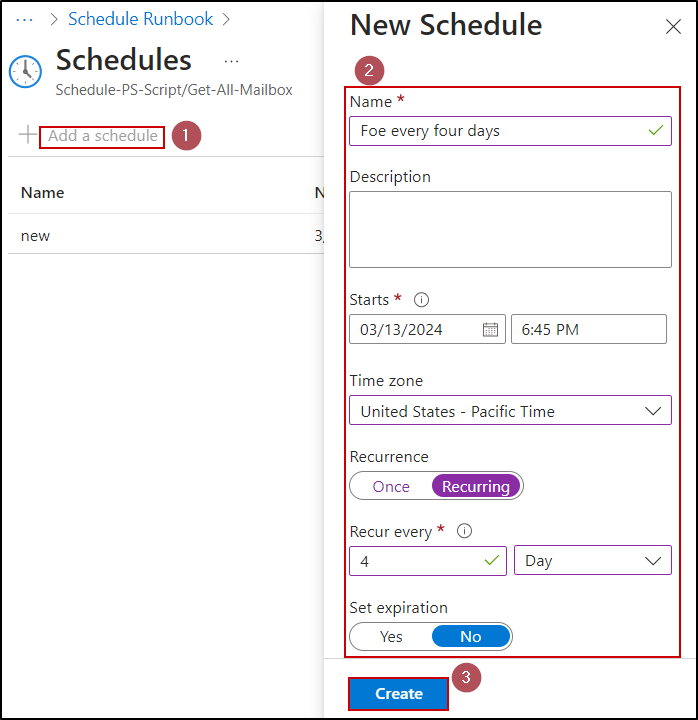
- Select the Schedules tab under the Shared Resources in the Azure Automation account.
- Click on the Add a Schedule button.
- Provide a name for the schedule, starting time, time zone, recurrence, and expiration state.
- Finally, select Create.
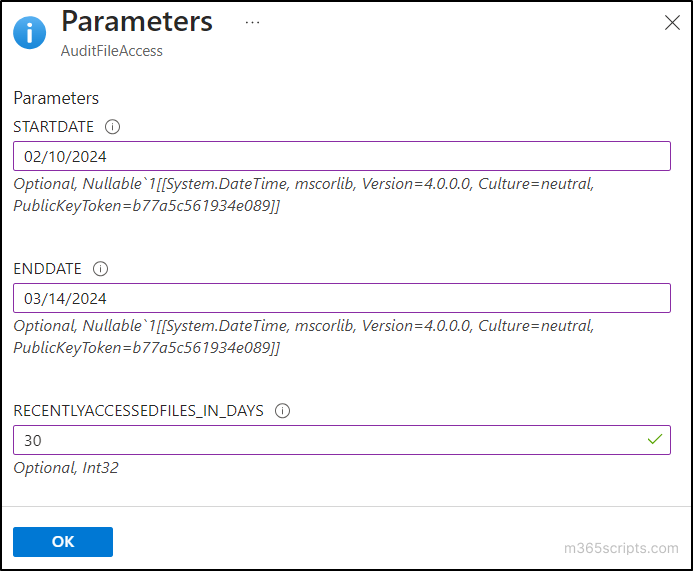
- If you want to schedule the PowerShell script with the parameters, choose the Configure parameters and run settings, and provide value for the params. Click OK.
- Finally, Select OK.
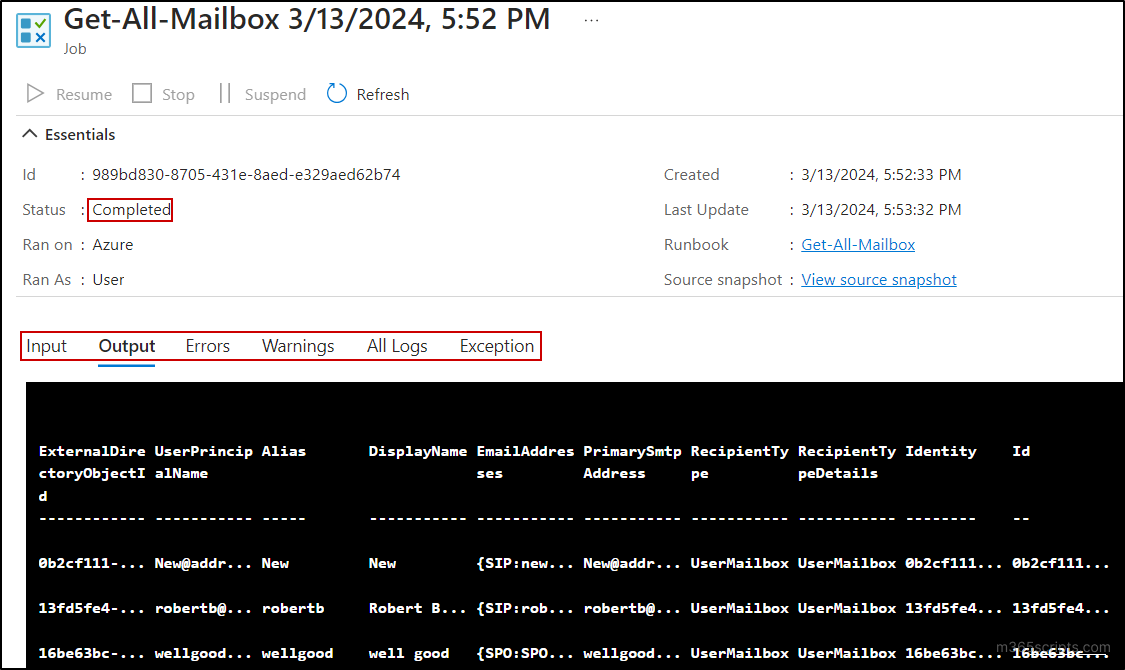
Furthermore, you can use the Jobs tab associated with the corresponding Runbook to search for and access manual and scheduled executions. For each job, you can view the status, input, output, errors, warnings, logs, and exceptions.
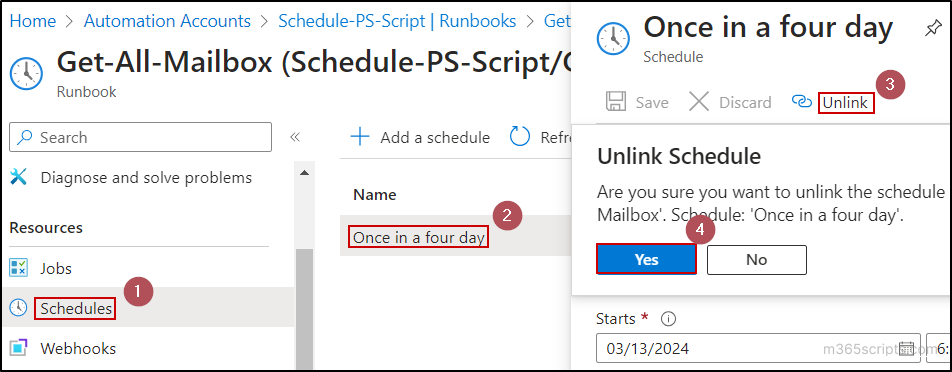
To remove the schedule for a script in Azure Automation, first, go to the respective Runbook. Then, navigate to the Schedules tab and choose the appropriate schedule. Click on the Unlink option and select Yes.
Key Takeaways
- Azure Automation excels at automating PowerShell scripts with non-interactive outputs. Scripts designed for user interaction are not ideal (prompts, input) for Azure Automation.
- Scripts exporting data to files (like CSV) can be automated, but it requires the configuration of an Azure Storage account for secure storage.
- Scripts that send outputs via email can be seamlessly automated through Azure Automation.
- While we can schedule PowerShell scripts with Windows Task Scheduler, it is limited to a single machine. Azure Automation can handle scheduling scripts across multiple servers or machines within your Azure environment, making it ideal for managing tasks in large deployments.
Overall, I hope that this blog helps you effectively schedule PowerShell scripts using Azure Automation. Feel free to reach out to us through the comments section if you have any questions. Stay tuned!