
Set-up Manager for Office 365 Users Using MS Graph PowerShell
Set up managers for Office 365 users using Microsoft Graph PowerShell after Azure AD module deprecation. Assign managers to individual users or bulk users based on department, job title, or other attributes. Automate manager assignments for efficient organizational hierarchy management.
Keeping your organization’s data and resources secure is no small task, and user account management in Office 365 is a critical piece of that puzzle! And in the Office 365 environment, “managers” play a key role in ensuring that users have the right level of access to essential services like SharePoint, OneDrive, etc. Therefore, setting up a manager for Office 365 users is of utmost importance.
But the major problem is, starting Mar, 2024, Azure AD and MSOnline modules will be deprecated completely! Therefore, we can no longer assign Office 365 managers with SetAzureADUserManager cmdlets, and it’s time to switch to the MS Graph PowerShell module. And, here, let us lend you a hand in explaining how to set up a manager for Office 365 using MS Graph PowerShell.
Assigning a manager to a user can be done in different ways:
- Set up Manager Via Multiple Admin Portals.
- Add Managers to Office 365 Users Using PowerShell.
Using UI:
Though setting up with all the admin portals may seem simple, a large enterprise has trouble assigning a manager to every user. Admin portals do not provide the option of assigning managers to multiple users at once, so this process takes quite a long time! Thus, UI mode is not a good choice for large enterprises for managing users in Office 365.
Using PowerShell: If you’re tired of switching between multiple admin centers to manage your Office 365 managers? Then, simplify your workflow with PowerShell! With PowerShell, admins can assign Microsoft 365 Managers and perform all their administrative tasks in one convenient location.
But, here comes the drawback, to set up a manager for Office 365 users based on the user’s specific property such as department, job title, usage location, etc., you need to depend upon multiple filters and cmdlets to get the desired result.
Take the following case where you must assign managers only to the “guest users” of the “United States”. Seems quite a complex task, doesn’t it?
Yes, but here, Our PowerShell script comes in handy! This script lets you easily filter user properties and assign managers while offering multiple use cases to cater to different requirements. Admins can make use of our script to set up a manager in Office 365 for multiple users, with no complications! Isn’t that cool to hear?
Script Download: SetAzureADUserManager.ps1
Script Highlights:
- The script uses MS Graph PowerShell and installs MS Graph PowerShell SDK (if not installed already) upon your confirmation.
- It can be executed with certificate-based authentication (CBA) too.
- Assigns Manager in Office 365 by using more than 10+ user properties, such as filtering by department, job title, and city.
- Furthermore, to assign a manager on a highly-filtered basis. You can use the following parameters.
- ExistingManager – Overrides your existing manager.
- ImportUsersFromCsvPath – Assign a manager to the bulk users through the CSV input file.
- ProcessOnlyUnmanagedUsers – Assign a manager to unmanaged users in the specific user property.
- GetAllUnmanagedUsers – Assign a manager to all unmanaged users.
- Automatically, downloads a CSV file. The CSV file contains the usernames that match the given condition.
- Credentials are passed as parameters, so worry not!
- Generates a log file that contains the result status of your manager assignment.
How to Execute the Script?
To run this script, you can choose any one of the below methods.
Method 1: You can use the below method to run script with both MFA & non-MFA accounts.
|
1 |
.\SetAzureADUserManager.ps1 |
Method 2: The script can be executed using certificate-based authentication (CBA), which is way more scheduler-friendly!
🡪 It is also possible to schedule the PowerShell script as a scheduled task in the Windows Task Scheduler using this format.
|
1 |
.\SetAzureADUserManager.ps1 -TenantId< TenantId> -ApplicationId <AppId> -CertificateThumbprint<CertThumbprint> |
Note: Create self-signed certificates for internal and testing purposes if you don’t want to lend money on CA certificates. And, the first step towards using certificate-based authentication is registering the app in Azure AD. In order to register and obtain certificates for an Azure app, refer to the Connect MS Graph with Certificates blog, which details the process, including manual and automated configuration options.
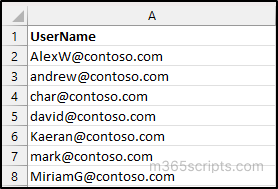
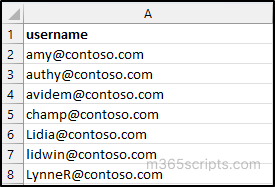
CSV File – List of Users That Matches given Condition:
As mentioned previously, it exports a CSV file containing a list of users who match the given filter criteria. With the help of the exported CSV file, you can verify whether the inputs are correct or not.
Exported Log Report:
And above all, this script makes everything easier by generating a log file along with it. The log file holds the success rate of the action you performed. By referring to this file, the admin can easily figure out whether the manager is actually assigned or if any error has been notified.
Occasionally, a glitch in the Azure AD or a network issue will result in the partial assignment of the manager to your Office 365 account. With the assistance of the log file, you will also be informed of the partial assignment. The below screenshot is an example of a ‘manager assignment log file’.

Our script supports in-built filtering parameters to assign managers based on the requirement. We have listed a few of the use cases below.
- Assign manager based on user properties.
- Replaces existing manager with a new manager.
- Assign a manager to users in a CSV file.
- Set up manager to unmanaged users based on the user properties
- Assign manager to all the unmanaged users
This script provides the advantage of filtering your users based on certain user properties and assigning them to the manager. You can assign a manager based on the following user properties.
- Department
- JobTitle
- CompanyName
- City
- Country
- State
- UsageLocation
- UserPrincipalName
- DisplayName
- AgeGroup
- UserType
You can assign an Azure AD Manager by crisscrossing any of the above properties and setup.
|
1 |
.\SetAzureADUserManager.ps1 |
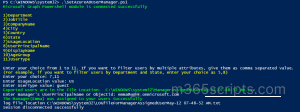
For example: If you want to set up an Azure AD manager named “Emma” for the “Guest users” located in the “United States”. Then, you can set it up as shown in the below screenshot.
Tip: To visualize the reporting structure better, use Org Explorer in Microsoft Outlook. This tool helps admins easily view the manager hierarchy, including all managers above a user and their direct or indirect reports. It also shows peers reporting to the same manager, with detailed report numbers available by hovering.
The -ExisitingManager parameter in Office 365 lets administrators quickly replace an existing manager with a new manager for multiple users at once, saving time and effort.
🡪 It’s useful in scenarios such as organizational restructuring, changes in leadership, or when a new manager needs to be assigned to a large team quickly.
For instance: Assume that “Emma” is your manager for Office 365. Now you must replace the existing manager with a new manager, “Frida”. In this case, you can use the “-ExistingManager” parameter to replace the existing manager with a new manager.
|
1 |
.\SetAzureADUserManager.ps1 -ExistingManager <UPN> -ManagerId <ManagerObjId> |
ImportUsersFromCsvPath – This parameter offers a convenient way
to assign a manager to the list of users available in the CSV file. This helps administrators quickly assign a new manager to multiple users without manually updating every user profile.
- The CSV file should have the User Principal Name (UPN) with the header ‘username‘ based on which the manager will be assigned.
- Then, run the script with the parameter “ -ImportUsersFromCsvPath” along with the path to your CSV file and assign managers to the specific users.
|
1 |
.\SetAzureADUserManager.ps1 -ImportUsersFromCsvPath “C:\Windows\ImportUserFromCsvPath.csv” -ManagerId <ManagerObjectId> |
ProcessOnlyUnmanagedUsers –
In some cases, you may override the existing manager when assigning a manager based on the specific user property. To avoid this kind of issue while assigning, use the “-ProcessOnlyUnmanagedUsers” parameter to set up managers only to users with no manager.
For example: If you want to set up an Azure AD manager named “Emma” for the “Guest users” located in the “United States” but with a condition to exclude the managed users and assign only to the “Unmanaged users”. Here, this function could be performed as shown below.
|
1 |
.\SetAzureADUserManager.ps1 -ProcessOnlyUnmanagedUsers |
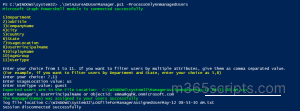
The above example assigns a manager to only unmanaged guest users in the US location.
Suppose, if you want to assign a manager to all the unmanaged users in your Office 365 rather than assigning managers based on the user properties. Then, you can make use of the parameter “–GetAllUnmanagedUsers” and assign a manager to all the users with no manager.
GetAllUnmanagedUsers –
This parameter finds all users with no manager, exports them to a CSV file, and assigns them a manager. Thus, this helps in tracing out all the users with no manager.
|
1 |
.\SetAzureADUserManager.ps1 -GetAllUnmanagedUsers -ManagerId <RefObjId> |
Thereby, this script helps to assign managers to all the unmanaged users and also assign managers to the users refined by specific properties.
In Microsoft 365, assigning managers is also important for displaying the organization chart across apps. Without it, the org chart won’t populate automatically, making it essential for visualizing team structures effectively.
Simply stopping after the assignment of Office 365 managers benefit the organization much time; equal importance for monitoring those Office 365 managers is very vital! Otherwise, it could lead to various problems, from poor user management to inefficient use of resources, such as assigning tasks to the wrong users, etc. Even though we can obtain information on Office 365 managers & direct reports using PowerShell, it is sometimes not much effective.
Then, if you are searching for ways to get detailed reports on Office 365 managers, then choose AdminDroid and hit the jackpot! 💯The free Azure AD reporting tool by AdminDroid offers detailed information on Office 365 managers and direct reports.
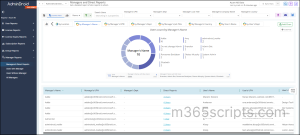

And the best part is, AdminDroid offers administrators a vast collection of Azure AD reports, absolutely free! This Azure AD reporting tool comes with
75+ Auditing Reports 45+ Statistical Reports 10+ Insightful Dashboards
It provides reports on the organization’s groups, group membership, Office 365 group membership changes, users, licenses, user logins, password changes, etc. You will have access to all Azure AD reports for FREE!
For a glimpse of what lies ahead, try out the free Azure AD reporting tool by AdminDroid and discover the endless possibilities of AdminDroid. Choose AdminDroid and get the advanced reporting features to stay on top of your organization’s email communication.
Coming to an end, assigning managers to your Office 365 users can help streamline workflows, increase productivity, and ensure that everyone is working towards common goals. Our script provides an easy-to-use solution for assigning managers to your Office 365 users, helping you to save time and effort.


